Finish-Along Tutorial - Needle Book
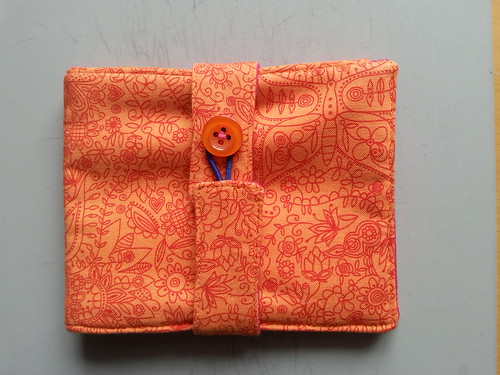
While you link up your finishes (and maybe even try to squeeze another one in before the deadline), we have arranged a series of tutorials to keep you entertained. Okay, and perhaps help you extend your list for quarter four! Today it's my turn and I'm going to show you how to make this needle book for your machine needles:
Fusible wadding (I used Vilene H640 - I used scraps and remnants, but a (metric) fat quarter should be enough)
Fusible interfacing (I used a lightweight cotton lawn because that's what was in my box. A heavier weight would also work)
Hair bobble and button for the closure
Thread to match/contrast with your fabrics
All the usual notions.
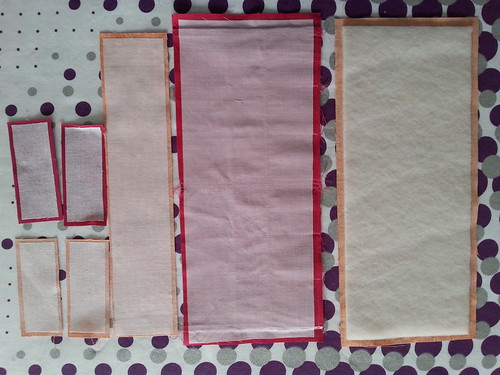
1 x {11" x 5"} - inside background
1 x {11" x 3.5"} - lower pocket
1 x {10.5" x 2.25"} - inside flap
2 x {1" x 5"} - side panels
2 x {3.5" x 1.5"} - inside of button straps
Also from lining fabric (or contrast, as in my sample):
1 x {11" x 6.25"} - upper pocket
From outer fabric(s) (mine is the orange):
1 x {11.5" x 5"} - outer panel
1 x {10.5" x 2.25"} - outer flap
2 x {3.5" x 1.5"} - outside of button straps
From interfacing:
4 x {3.25" x 1.25"} - button strap pieces
1 x {10.25" x 2"} - flap
2 x {1.25" x 4.75"} - side panels
1 x {11" x 4.5"} - lining
1 x {11" x 4.5"} - outer (optional)
From wadding:
1 x {11" x 4.5"} - outer panel
All seam allowances are 3/8" unless otherwise stated.
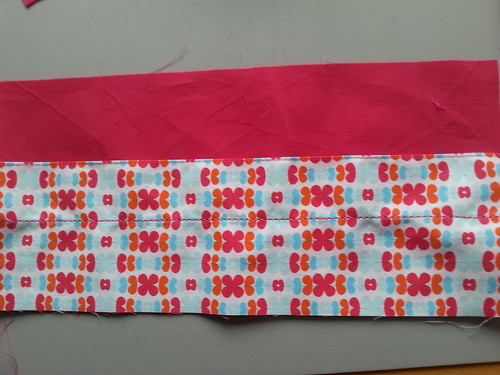
Lay the upper pocket on top of the lining background (right side up), raw edges aligned, and stitch a line a smidge over 1 3/8" from the folded edge. I used triple stitch to make this sturdy as it forms the bottom of the upper pocket. Press.
Position the lower pocket piece so that raw edges are aligned and pin in place. Using chalk/preferred temporary marker, draw a line down the centre of the piece (or press it in half and follow the crease) and stitch down it and then 1/4" either side of it, using triple stitch if preferred. You can now trim 1/8" - 1/4" off the bottom of the upper pocket piece to reduce bulk later on, if you wish.
Draw lines across both pocket pieces a smidge under 1 5/8"to the left of the left hand line of stitching, and then draw another line a smidge under 1 5/8" away from that line. Repeat on the right-hand side of the piece. If your machine needle boxes are a different make from those shown in the photo at the top of the post, you may wish to move these lines by 1/8" or so to get a snug fit.
Using triple stitch, stitch from the folded edge of the upper pocket down to the raw edge on all four lines. Take the thread ends at the top of the pocket through to the back to secure (by tying the ends together and then threading through the stitching to secure). Press.
Trim this piece to 10.5" x 5" and machine tack along the two short sides to secure the edges of the pockets.
Attach the side panel pieces to either side of the lining piece using 1/4" seam allowance. Press.
Fuse the interfacing to the wrong side of the lining piece (and the wrong side of the outer piece, if you're adding it), the wadding to the wrong side of the outer piece and the interfacing to the wrong side of each of the button strap pieces and the outer flap piece.
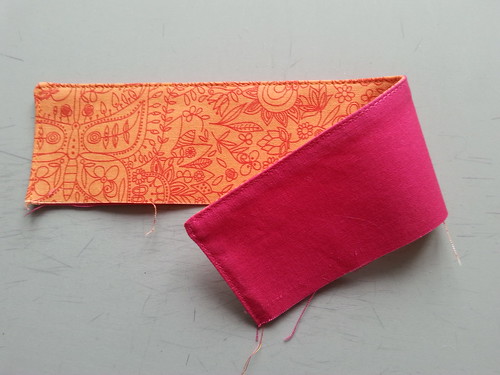
Put the two flap pieces wrong sides together and stitch from the beginning of a short side, across the top and down the other short side with a 1/4" seam. Clip the corners and turn through. Roll the seams, press and top stitch along the same three sides.
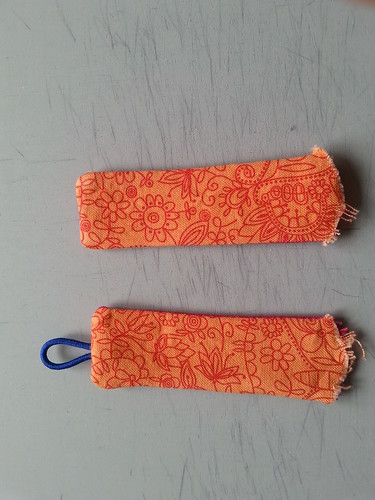
Put a strap lining piece and a strap outer piece right sides together and stitch along three sides using a 1/4" seam allowance, leaving one of the short sides unstitched. Repeat with the other strap pieces, but this time include an elastic loop on the short side. How long the loop needs to be depends on how large your button is, so do a little experimenting until you get the loop you need. Clip the corners (and the excess hair bobble) and turn through. Roll the seams and then press.
Top stitch the three sides of both button straps.
Tack the flap and then the button straps in place on the lining piece to keep them in place during the assembly, using the photo below to help with positioning.

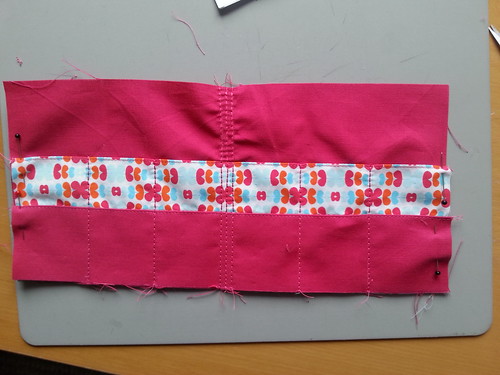
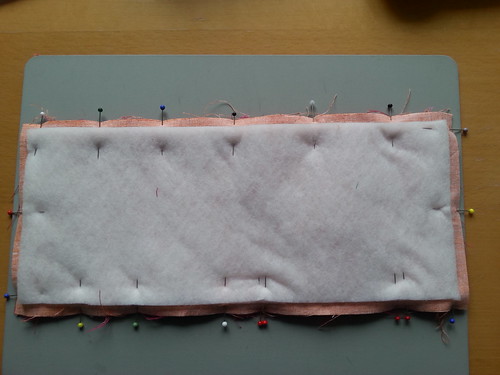
Place the lining piece and the outer piece right sides together, pin and sew together (3/8" seam allowance), leaving a turning gap along the bottom edge (mine is marked by the double red pins in the photo below).
Clip the corners, turn through, roll the seams and press. Top stitch.
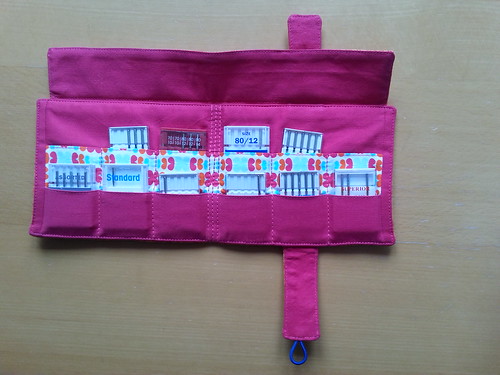
Fill with boxes of machine needles. I use the space between the upper pocket and the flap, the inside of the flap, and the outside of the lower pockets to store part-used needles, sometimes on scrap pieces of wadding if they're an unusual needle for me (e.g. my metallic needle, of which I have one, and which is rarely used!).
This tutorial is based on a needle book I made at a workshop designed and run by a friend, Beryl Frank of Knot, Guisborough, North Yorkshire (UK). I have her permission to recreate her idea for this tutorial and have altered some aspects of the design so as not to completely recreate her design here.
And it wouldn't be a blog post without Archie, now would it?
You will need:
Assorted scraps of fabric, some around 11" long and others smaller. I have only made this with scraps and remnants, but a couple of (metric) fat quarters should be enough.Fusible wadding (I used Vilene H640 - I used scraps and remnants, but a (metric) fat quarter should be enough)
Fusible interfacing (I used a lightweight cotton lawn because that's what was in my box. A heavier weight would also work)
Hair bobble and button for the closure
Thread to match/contrast with your fabrics
All the usual notions.
Cut:
From lining fabric(s) (mine is the pink solid):1 x {11" x 5"} - inside background
1 x {11" x 3.5"} - lower pocket
1 x {10.5" x 2.25"} - inside flap
2 x {1" x 5"} - side panels
2 x {3.5" x 1.5"} - inside of button straps
Also from lining fabric (or contrast, as in my sample):
1 x {11" x 6.25"} - upper pocket
From outer fabric(s) (mine is the orange):
1 x {11.5" x 5"} - outer panel
1 x {10.5" x 2.25"} - outer flap
2 x {3.5" x 1.5"} - outside of button straps
From interfacing:
4 x {3.25" x 1.25"} - button strap pieces
1 x {10.25" x 2"} - flap
2 x {1.25" x 4.75"} - side panels
1 x {11" x 4.5"} - lining
1 x {11" x 4.5"} - outer (optional)
From wadding:
1 x {11" x 4.5"} - outer panel
All seam allowances are 3/8" unless otherwise stated.
Method:
Press the upper pocket piece in half (wrong sides together) and top stitch along the folded edge. Press. Repeat with the lower pocket piece.Lay the upper pocket on top of the lining background (right side up), raw edges aligned, and stitch a line a smidge over 1 3/8" from the folded edge. I used triple stitch to make this sturdy as it forms the bottom of the upper pocket. Press.
 |
| Machine settings for triple stitch - it's stitch number six on my machine and I've got the length at 3 |
 |
| Upper pocket attached to background lining piece with triple stitch for reinforcement |
Position the lower pocket piece so that raw edges are aligned and pin in place. Using chalk/preferred temporary marker, draw a line down the centre of the piece (or press it in half and follow the crease) and stitch down it and then 1/4" either side of it, using triple stitch if preferred. You can now trim 1/8" - 1/4" off the bottom of the upper pocket piece to reduce bulk later on, if you wish.
Draw lines across both pocket pieces a smidge under 1 5/8"to the left of the left hand line of stitching, and then draw another line a smidge under 1 5/8" away from that line. Repeat on the right-hand side of the piece. If your machine needle boxes are a different make from those shown in the photo at the top of the post, you may wish to move these lines by 1/8" or so to get a snug fit.
Using triple stitch, stitch from the folded edge of the upper pocket down to the raw edge on all four lines. Take the thread ends at the top of the pocket through to the back to secure (by tying the ends together and then threading through the stitching to secure). Press.
Trim this piece to 10.5" x 5" and machine tack along the two short sides to secure the edges of the pockets.
Attach the side panel pieces to either side of the lining piece using 1/4" seam allowance. Press.
Fuse the interfacing to the wrong side of the lining piece (and the wrong side of the outer piece, if you're adding it), the wadding to the wrong side of the outer piece and the interfacing to the wrong side of each of the button strap pieces and the outer flap piece.
Put the two flap pieces wrong sides together and stitch from the beginning of a short side, across the top and down the other short side with a 1/4" seam. Clip the corners and turn through. Roll the seams, press and top stitch along the same three sides.
Put a strap lining piece and a strap outer piece right sides together and stitch along three sides using a 1/4" seam allowance, leaving one of the short sides unstitched. Repeat with the other strap pieces, but this time include an elastic loop on the short side. How long the loop needs to be depends on how large your button is, so do a little experimenting until you get the loop you need. Clip the corners (and the excess hair bobble) and turn through. Roll the seams and then press.
Top stitch the three sides of both button straps.
Tack the flap and then the button straps in place on the lining piece to keep them in place during the assembly, using the photo below to help with positioning.
Place the lining piece and the outer piece right sides together, pin and sew together (3/8" seam allowance), leaving a turning gap along the bottom edge (mine is marked by the double red pins in the photo below).
Clip the corners, turn through, roll the seams and press. Top stitch.
Fill with boxes of machine needles. I use the space between the upper pocket and the flap, the inside of the flap, and the outside of the lower pockets to store part-used needles, sometimes on scrap pieces of wadding if they're an unusual needle for me (e.g. my metallic needle, of which I have one, and which is rarely used!).
This tutorial is based on a needle book I made at a workshop designed and run by a friend, Beryl Frank of Knot, Guisborough, North Yorkshire (UK). I have her permission to recreate her idea for this tutorial and have altered some aspects of the design so as not to completely recreate her design here.
And it wouldn't be a blog post without Archie, now would it?
 |
| Phew, this tutorial writing lark is exhausting. I'll just lie here a while and recover... |
Ooohhhhh very nifty! Will make one, hugs and biskits to Archie xx
ReplyDeleteOoohhhhh very nifty! Will make one, hugs and biskits to Archie xx
ReplyDeleteI've only got about 3 different kinds of needles, but you've given me an idea... I buy zippers whenever I see them on special, or in charity shops, etc, because I always need one when I don't have one handy. But they're a bugger to store, and some sort of thingy for storing them by size would be really useful. Rolling them around a band along the middle of a zipper 'book' would do the trick. Thank you!
ReplyDeleteI'd better make one to keep my machine needles happy ! They might be jealous of all the needlebooks I have for hand stitching needles....
ReplyDeleteIt's lovely and so cute! I keep my needles in a box but this would be great for when I take my sewing stuff on the road. It's on the list now.
ReplyDeleteI so need to make this!
ReplyDeleteI Love my Needle Book.. You are so clever . . . and this tutorial is perfect.
ReplyDeleteThankyou Helen . . for my "Famous" Needle book!
That's a great idea!
ReplyDelete