Oakshott Lipari Blog Hop: Pretty Little Thing Table Runner

Today is my turn on the Oakshott Lipari blog hop, which is being hosted by Lynne and runs for the month of May and showcases Oakshott's Lipari collection. I've made no secret of the fact that I'm a huge fan of Oakshott's fabrics - they're beautiful to look at, as well as being lovely to sew and I'm honoured to be part of this blog hop. Thank you, Lynne and Michael, for inviting me to take part and trusting me with the fabric!
Oakshott's Lipari collection contains eighteen colours, and each of the colours has a black warp and a different coloured weft which results in luxurious colours that shimmer and shine. The fabrics subtly change shade depending on the light and this gives projects a really special look that you just don't get with other fabrics. Also, the fabrics are 54" wide so you get a lot more than you'd expect in a fat eighth bundle, which is always good! You can find out more about the inspiration for this collection here.
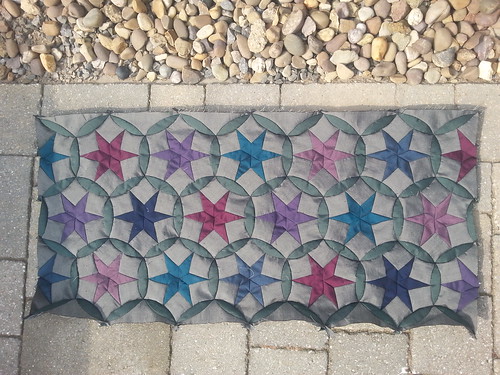
At this point, I would usually unveil my finished project, but I have a confession to make: I haven't completely finished my project! Don't fret, I've finished all the piecing and have all the photos I need for this tutorial, it's just that a month (literally a month - the fabrics arrived on 11th April and I'm writing this on 11th May) isn't long enough to hand piece, quilt and bind a project larger than a mini quilt! So, with that in mind, here's what I've made:
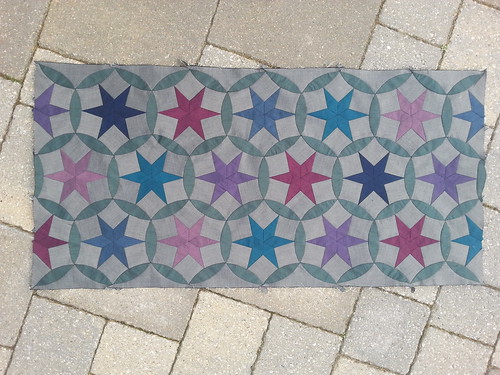 |
| Oakshott Liparis table runner |
I found the block in 5500 Quilt Block Designs by Maggie Malone (ISBN 4972507749), where it's called 'A Pretty Patchwork'. There isn't a reference for when it was first called by this name or who first designed it, so I'm assuming it's one of those 'been around for as long as anyone can remember' blocks like the churn dash or nine patch. I don't tend to name my projects (other than calling them what they are: the hexy quilt, the blue and white quilt, that one I made for Nanna, etc.), but at the moment I'm calling this 'Pretty Little Thing' (aka 'What On Earth Was I Thinking?' or 'I Must Not Have Been In My Right Mind') which makes me think of the Queen song.
I'm not going to do a step-by-step tutorial for this project as most of it is fairly straightforward piecing (albeit a little time consuming!) but I will share some progress photos which show my stitching sequences and some tips to make things a little easier, as well as some general hand piecing tips. Let's get on with it, shall we?
You will need:
Fat eighth bundle of Oakshott Lipari
0.5m Pollara (for the background in the stars blocks)*
1m Salina (for the segments, backing and binding)*
Wadding (approximately 40" x 20")
Thread (I used Aurifil 50wt 2692 (black) and 5004 (mid grey))
Paper (to make templates, I use freezer paper)
Template pattern (find that here)
* Please be aware that you may need a bit more than this, depending on how you arrange your template pieces on the fabric, but these two colours are in the fat eighth bundle so you have a little extra to play with if needed!
Prepare the following pieces:
21 B pieces in each of the following colours: Lipari (dark pink), Marina (teal), and Gallina (purple).
15 B pieces in Scari (mid blue).
12 B pieces in Volcano bleu (dark blue).
18 B pieces in Canneto (mid pink).
104 C pieces in Pollara (grey - background for the stars) and 8 'half C' pieces (edge pieces for the half stars) - cut template C along the red dotted line to make a half C piece. You will need both halves of the C template for each half star as it needs two mirror pieces to make it correctly.
65 A pieces in Salina (green) and two 'half A' pieces.
12 E pieces in Pollara.
Tips for preparing templates and fabric pieces:
- I print my templates onto freezer paper and then iron them to the reverse of the fabric (although there's no reverse side for Oakshott because it's woven), draw round them with a fine pencil and then cut out approximately 0.25" from the drawn line. The freezer paper stops the fabric from shifting when drawing round the templates.
- Use a fine mechanical pencil to draw the sewing lines, and use a ruler to help draw any straight lines.
- Make sure you haven't got 'fit to page' selected before printing.
- It doesn't really matter if your 1" test square isn't exactly 1" square, as long as you've printed all your sheets with the same printer using the same settings, and all your pieces are the same on each sheet of templates.
- Use a strip of paper/card 0.5" wide to help space the templates.
- Remember to include the match marks when drawing round the templates as these will help enormously when sewing the curved seams.
- Extend the sewing lines beyond the points of the templates as this helps you see the start/stop point more easily.
- The E template has very fine points at either end so take extra care when preparing these pieces.
- There is no D template! (So don't panic when you can't find it on the sheet!)
- When cutting out my pieces, I like to have something on my lap to catch the off-cuts (in this case the lid of my sewing tin, but it's often a cereal bowl) which keeps things a little tidier.
- Clip the curved seams before you start. I clipped about halfway through the seam allowance (about 1/8") and clipped above the match marks and twice between each match mark.
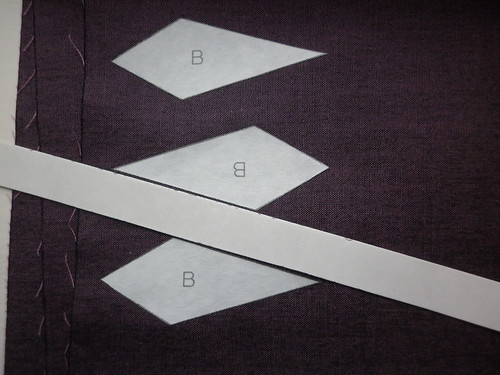 |
| Spacing the templates |
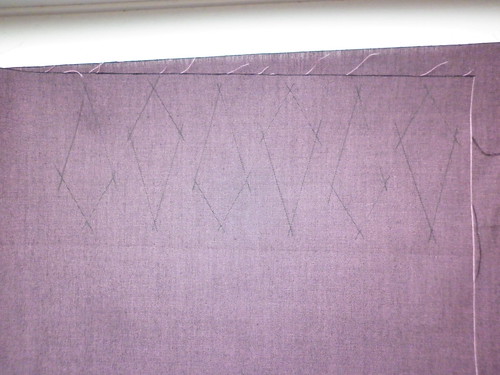 |
| Extending the sewing lines beyond the points of the template |
 |
| It's a little hard to see (grey pencil on green fabric is quite hard to photograph!) but if you look closely, you will just be able to see the match marks as well as the drawn line going beyond the ends of the template. |
 |
| Catching the off-cuts |
Make the following sixteen whole stars and four half stars:
- Three whole stars and one half star in each of Lipari (dark pink), Marina (teal), and Gallina (purple).
- Two whole stars and one half star in Scari (mid blue).
- Two whole stars in Volcano bleu (dark blue).
- Three whole stars in Canneto (mid pink).
Tips for piecing the star blocks:
- I used black thread to join the star pieces together (the colours) and then mid-grey thread to join in the background (grey) pieces.
- Use as much continuous stitching as possible to avoid starting and stopping unless necessary.
- Start and finish each seam with a back stitch (I also use a knot when starting a new length of thread, but many hand sewers don't.)
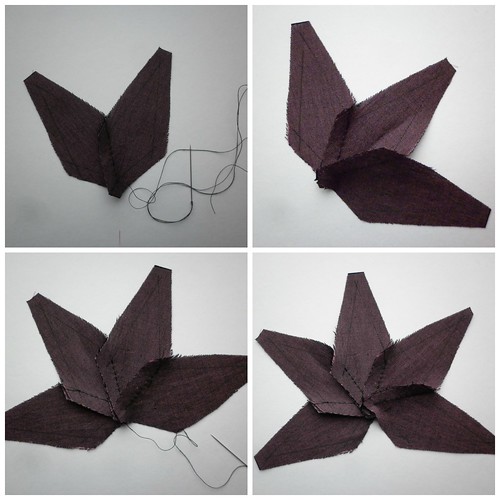
- I stitched the first pair of star points together from the outside in, and then stitched the next piece onto that pair from the centre out (i.e. without breaking the thread). I continued round the star until I'd joined all six pieces together.
- Circle the intersection when piecing in the final piece. This helps close up any small hole in the centre and draws the points together.
- When piecing in the background pieces, sew from the background piece side as it's a little easier to see the sewing lines.
- Finger press as you go. (It's easier if you make sure all your seams go in the same direction.)

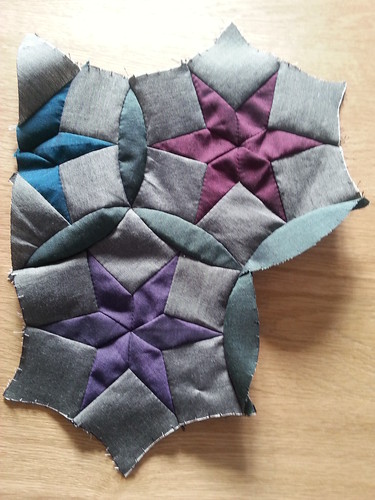
Arrange the stars and half stars as shown in the photo at the start of this post (or however you want them!) and start joining them together, adding in the segment pieces as you go. I started by joining two stars together (with a segment in between), then added two more segments and then joined a third star onto that piece:


Tips for joining star blocks and segments:
- Use mid-grey thread so it doesn't show through. If you don't have an exact match then it's better to go for thread a shade darker rather than a shade lighter because slightly-too-light thread will show up far more than slightly-too-dark thread.
- Stitch from the star side of the seam - it's easier!
- Pin, pin and pin some more! I put a pin through each match mark as well as the beginning and end of each seam and often put a pin between as well.
- You may find it easier to just pin one section (i.e. the space between match marks) at a time and then stitch that before moving to the next section.
- Use whichever stitching sequence you find easiest, which won't necessarily be the same as mine.
- Don't despair! It can be easy to get a bit lost with where you are, which is why I worked along the first two rows, joining first one star to the top row and then one star to the middle row.
- When joining on the bottom row stars, I attached three segments before attaching a star.
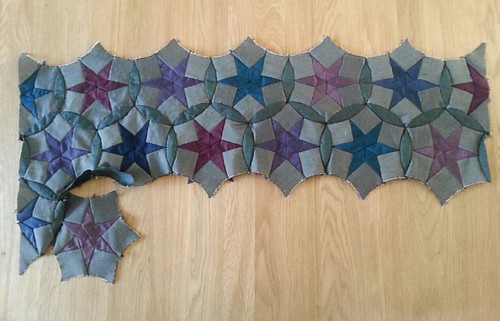 |
| You can just make out the three segments I've attached before joining on the next star |

Tips for joining in the edge pieces:
- Template E has very sharp points and it can be tricky to prepare the pieces accurately. You may find that you need to slightly alter your sewing line (or where the beginning/end of the sewing line is) when joining to the segments. Pin the match marks and the obvious seam start/end first and then use the intersection on the segment pieces as your guide for the start/end point of the curved seam.
- Stitch from the grey side. Even though the end point can be harder to spot on this side, the rest of the stitching is easier from this side.
- I joined two segments to each edge piece (to make a piece resembling Mr Potato Head's moustache) before then joining this piece to the rest of the table runner. It was much easier and quicker this way.
- I found that, contrary to experience and received wisdom, I got a better result when joining the 'moustache' to the runner if I started each seam with a new piece of thread rather than doing continuous stitching all the way along each side.
- Remember to circle the intersection where three segments meet to get a neat finish.
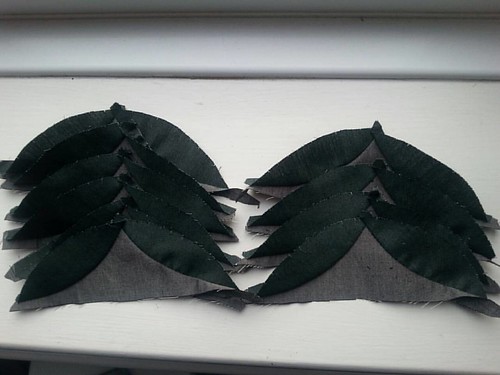 |
| Edge pieces and segments joined before attaching to the edge of the table runner |
 |
| One edge piece attached |
Once all the pieces are joined together, take a few moments to lay it out and admire your stitching. This step is important because the next step (pressing the seams) can be a little soul destroying and you need an image of the finished item in your head to spur you on!
This is how my project looked once the piecing was finished, but before I pressed the seams:
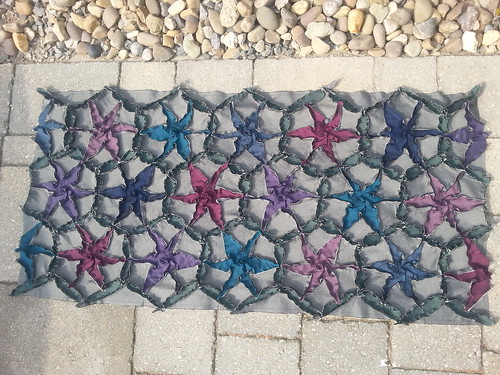
Tips for pressing the seams:
- It's a s*d of a job, just keep going!
- Do your best!
- A little bit of steam helps, but only a little bit or you'll end up distorting those bias seams! I had my iron on the second lowest steam setting (there are six), and at the start of the cotton (three dots) heat setting.
- Where possible, it's easier if you can press the star seams in place first before tackling the segment seams.
- I pressed all the segment seams towards the centre of the segment.
- As far as possible, swirl the seam intersections to reduce bulk.
- The clipped seams help you to squash the seams under each other.
- Once you've pressed all the seams as best you can, turn it over (right side up) and inspect all the seams to see which need a bit more attention. Turn it back over and tackle each one, it's usually that part of the seam close to where three segments meet is turned back on itself.
- Once all the seams are as good as you can get them, turn it right side up again and give it a good press (with a little bit more steam) to give a crisp finish. A little (and I mean a little!) judicious 'squashing' with the iron can work wonders with any stubborn segment intersections!
 |
| Pressing the seams - those on the right have been pressed into submission, those on the left are yet to be tackled. |
 |
| It's easy to spot any seams which need more attention, you can see where they've not acquiesced and followed the 'go towards the centre' instruction! They soon realised the error of their ways... |
 |
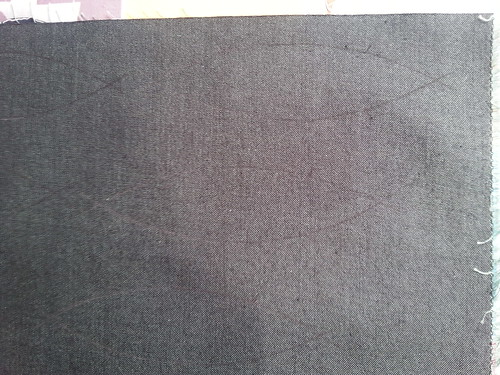
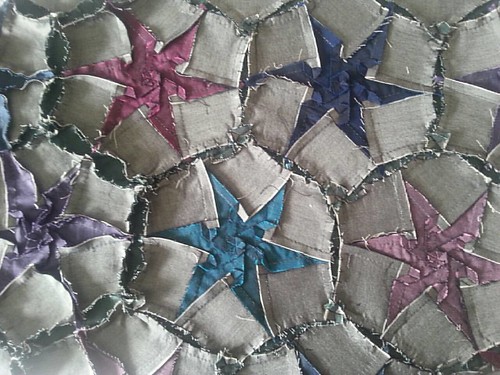
| Pressed seams from the back |
 |
| Much better! |
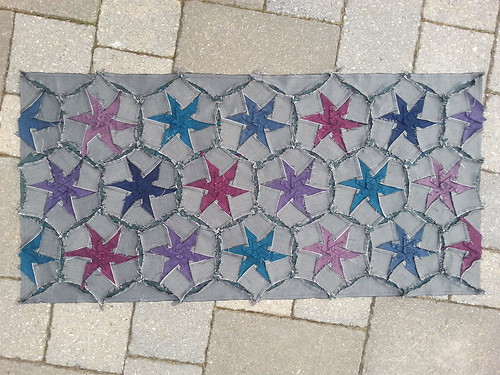
At the moment, I think I'm going to quilt in the ditch either side of the segments and possibly round each star. However, there's a chance that I'll do straight line quilting (in the same mid-grey I used for the piecing) when it comes to it. It very much depends on whether I think I can get a good result with the ditch quilting with those squashed seams at the ends of the segments. Or there's always crosshatch quilting, perhaps at the same angle as the centre line of the segments? Hmmm...decisions, decisions! (Feel free to wade in with an opinion!)
If you make this project, I'd love to see it! You could email me a photo (archiethewonderdogblog at gmail dot com), contact me on Twitter (@Archiewonderdog) or on Instagram (also @Archiewonderdog) and use #prettylittlethingblock so I find it! Good luck!!
Edited to add: It's now finished! http://archiethewonderdog.blogspot.co.uk/2016/06/pretty-little-thing-table-runner.html
Here's the schedule for the blog hop, please follow along and see what everyone has made with these beautiful fabrics:
5 May Allison Dutton allison-sews.blogspot.com
10 May Nicholas Ball quiltsfromtheattic.wordpress.com
12 May Me!!! archiethewonderdog.blogspot.com
17 May Lynn Harris thelittleredhen.typepad.com
24 May Jessica Skultety www.quiltyhabit.com
26 May Karin Jordan www.leighlaurelstudios.com
31 May Elisabeth Vaughan sharksdinner.com
2 June Kitty Wilkin nightquilter.com
Now, if you'll excuse me, I have some plants to plant and some housework to do. I think I'll have a little lie down first, though!
Thanks for popping in!
P.S. You didn't think I'd blog without a photo of Archie, did you?!
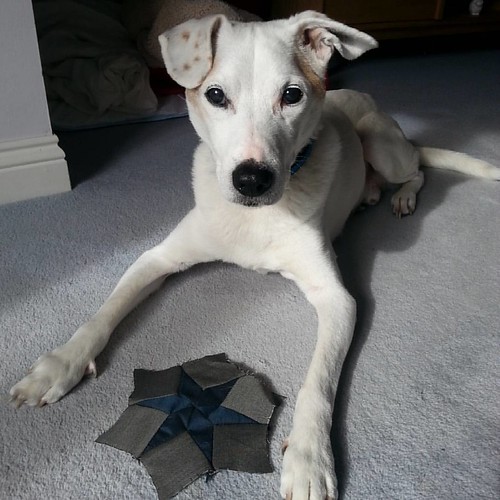 |
| I quite like this star, is it for me? |
I absolutely love this, and the Oakshott fabrics are extremely beautiful. Did you find the weft threads frayed more than the black warp, so you had to be really careful about cutting precisely on the straight grain? I've had this problem with shot fabrics from other makers, and wondered if it was a function of the fabric construction. My favourite photo is where you have the runner on the grey concrete block path; it looks as if the stars are standing out of a grey voile background, as if you're seeing the concrete through the grey areas. Beautiful...
ReplyDeleteWow, it is gorgeous. You must be exhausted. There is so much work in that project. It shows the lovely fabric to great advantage. I like the tip for extending the sewing lines to show the intersection better. Archie of course has been very patient whilst you've been spending time sewing instead of paying attention to him, he deserves a treat.
ReplyDeleteWow - gorgeous and I understand if you need to lie down for a week. Totally beautiful - there are no words to say how much! Interested to know what you are backing it with and binding or will it be a knife edge finish? I watched Poirot yesterday so the mustache reference was particularly vivid!
ReplyDeleteStunning! I love the progress shots and seeing the back of the work too! Lots of great tips, thank you :)
ReplyDeleteHad a slight sidetrack with Freddie twerking on a pole, but then I got back to your amazing piecing skills.
ReplyDeleteHelen this is breathtaking and the work involved in even explaining it to us is phenomenal and I appreciate it as you have so many skills to share.
Well done you for such a lovely runner for us all to adore. . . now you need to rest!
And Archie . . that is too big to be a biscuit....anyway you are "the star"
It's a beautiful pattern, although, I'm not sure I'd have the patience to manage ironing all those seams! You are an inspiration!!
ReplyDeleteBeautiful, lots of very nice stitching
ReplyDeleteThank you!
DeleteGreat job!! I was not completely sold on this colorway, but now I am, the grey and white? look really good. This is not a block I have seen before, but am bookmarking this to come back to, you never know...
ReplyDeletecork@pa.rr.com
wow - awesome job on that - you make it look easy!! mumbird3(at)gmail(dot)com
ReplyDeleteTable? No, wall surely, please!!! I beg you, hang it!!
ReplyDeleteIt must have been incredibly fiddly! It's really beautiful.
ReplyDeleteThis is a fantastic piecing project! Wonderful.
ReplyDeleteThank you!
DeleteWhat an AWESOME job!!! Love it!!
ReplyDeleteI am in total awe of your skills in hand piecing, I could no more do it than fly - what a gorgeous result.x
ReplyDeleteWHAT A BEAUTIFUL JOB ON THIS PROJECT! THANKS YOU FOR SHARING!
ReplyDeletemsstitcher1214@gmail.com
Lots of work, but such a beautiful outcome!
ReplyDeleteNice hand work and very pretty to boot love the colors.... happyness044312yahoo.com
ReplyDeleteThank you! I'm afraid my email reply bounced back so I hope you see this reply instead!
DeleteWhat patience you have to make such a detailed quilt. Thanks for all the tips.
ReplyDeleteAwesome!! I love the runner.
ReplyDeleteJust incredible
ReplyDeleteYour work is stunningly beautiful, I can't imagine making something like that. I have an idea, since you are "sew" busy why not send Archie over here, sorta like a little canine camp retreat. (o:
ReplyDeleteHugs
This is really beautiful! I love the subtle colour of the lipari. Very patient beautiful sewing!
ReplyDeleteThis is stunning! And a fantastic tute too :)
ReplyDeleteSimply stunning! The design and the color you used are wonderful.
ReplyDeleteIt's so pretty! And yes, a TON of work. Can't wait to see it all finished up.
ReplyDeleteWow, this is wonderful. After all that hand piecing, personally I would go for hand quilting.
ReplyDelete